- Phillips and flat screwdriver.
- Dark area with a vertical wall and 25 feet (7.5m) of flat
space in front of it.
- Tape measure
1. Check that you have the right tire pressure and a full
tank of gas. You are suppose to put the normal load in the
car (driver+ regular passengers) but this is not a problem
without.
2. Place your E34 lights 25 feet (7.5m) perpendicular to the
wall.
Marking the wall:
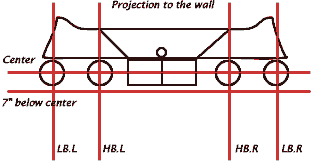
3. You can mark the wall with chalk if you want. I just measured
back and forth.
Center is the horizontal line at the same height as
the headlights.
7" below center is the line 7" (17.8cm) below
the center line (Duh!).
LB.L / LB.R are the vertical lines through the center
of the low beams.
HB.L / HB.R are the vertical lines through the center
of the high beams.
Adjustment screws location:
- The screw to move the light up and down is located at
the front of the grill.
- The screw to move the light left and right is located in
the engine compartment next to the fender, it is a long piece
of white plastic.

Low Beams:
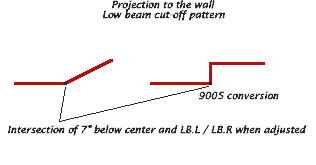
3. Turn on the low beams.
4. Turn the adjusting screws to move the cut-off spot to the
intersection of 7" below center and LB.L
or LB.R.
High Beams:
5. Turn on the high beams.
6. Turn the adjusting screws to move the center of the high
intensity light zone on the intersection of lines Center
and HB.L / HB.R.

|

